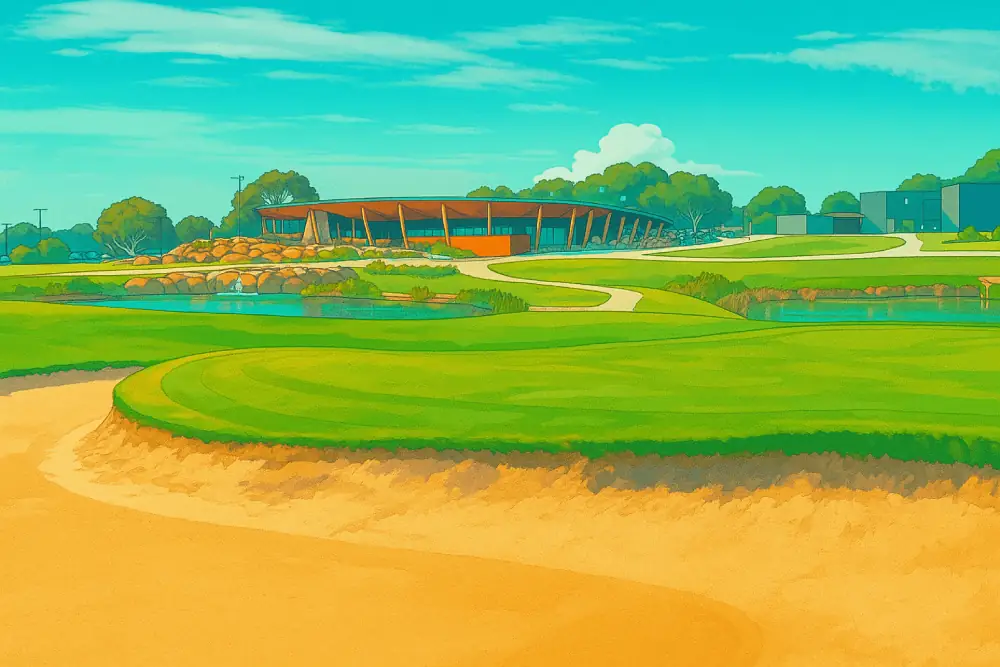
Down at the very tip of the Mornington Peninsula, about a 90-minute drive from Melbourne, sits one of Victoria’s true coastal gems — Portsea Golf Club. Perched on the dunes and just a short stroll from the beach, this 18-hole course blends natural beauty with strategic design, offering a round that’s as scenic as it is challenging.
Every hole has a bit of bite — not unfair, just enough to keep you honest. With four tee options (White, Yellow, Blue, and Red), the course caters to everyone from first-timers to scratch golfers looking for a test.
The opening par-4 sets the tone early: 370m (404y) off the blues, with a fairway that rewards accuracy and bunkers that punish the slightest miss. From there, you’ll find a mix of tight par 4s demanding precision, long par 5s inviting you to open the shoulders, and short par 3s where coastal winds can turn club selection into pure guesswork.
Hole 3 is a standout. A 436m (477y) par 5 from the whites, it’s classic risk-reward golf — go big and carry the bunkers, or lay up smart and play for position. Either way, it’s a hole you’ll remember.
The layout is a rollercoaster of elevation changes, blind shots, and ocean glimpses that’ll make you forget about that last three-putt. The fairways are lush, the greens roll true, and the bunkers… well, you’ll get to know them. We spent more time in there than a kid on school holidays.
After your round, grab a beer on the balcony overlooking the course — it’s the perfect spot to relive the highlights and the heartbreaks. With friendly locals, top facilities, and a laid-back coastal vibe, Portsea Golf Club delivers in every way.
If you’re planning a Mornington Peninsula golf weekend, don’t stop at one round — check out Eagle Ridge Golf Course just up the road. It’s another favourite among locals and visitors alike, known for its manicured fairways and resort-style layout. Portsea brings the coastal strategy; Eagle Ridge brings the parkland polish — both worth a swing.
Location: Relph Avenue, Portsea, VIC, Australia
Website: www.portseagolf.com.au
Phone: +61 (03) 5984 2909
Tee Boxes
| Tee | Yardage | Course Rating | Slope |
|---|---|---|---|
| White | 5747 | ||
| Blue | 5635 | 72 | 113 |
| Red | 5078 | 69 | 124 |
Hole by Hole Breakdown
Portsea Golf Club Hole 1 – Par 4

Index: 6
Lengths: White: 308m, Blue: 370m, Red: 284m
Portsea’s first hole is a beauty to kick things off—a par 4 that’s as inviting as it is sneaky. From the Blue tees it stretches out to 370m (404y), with the Whites at 308m (337y) and Reds at 284m (311y), so there’s a distance to suit whatever swing you’ve brought on the day. No Yellow tee here, so less faffing about before you rip your first shot. It looks friendly from the tee, but don’t get too comfy—stroke index 6 tells you there’s more going on under the hood. The fairway’s generous enough, but it rewards a smart, placed tee shot over brute force, and the approach is guarded by a few well-positioned bunkers that love gobbling up anything short or offline. No water to worry about and barely any trees, so you get a clear look at the green—thread it right and there’s a genuine birdie sniff to start your round with a grin.
Portsea Golf Club Hole 2 – Par 3

Index: 18
Lengths: White: 151m, Blue: 266m, Red: 121m
Portsea Golf Club’s Hole 2’s a cheeky little par 3 that’ll give you a breather—on paper, anyway. It plays 151m (165y) off the Whites and 121m (132y) from the Reds, and with a stroke index of 18, it’s technically the easiest hole on the course… but don’t go switching off just yet. There’s no bunkers, no water, and barely a tree in sight, so it’s all about your swing and your nerve. Hit it clean, and you’re laughing—but miss the green and suddenly your “easy par” becomes a scramble with your wedge. It’s a short one, sure, but it’ll still punish lazy swings. A tidy little hole to steady the ship before the course starts showing its teeth.
Portsea Golf Club Hole 3 – Par 5

Index: 14
Lengths: White: 436y, Yellow: 0y, Blue: 167y, Red: 380y
Hole 3’s a par 5 that looks like it’s handing out birdies but can bite if you’re not switched on. It stretches to 436m (477y) off the Whites, with the Reds at 380m (416y) and the Blues coming in short at 167m (183y)—bit of a head-scratcher on the tee options, but hey, no Yellow to worry about. The fairway’s nice and wide, so you’ll be tempted to let the big dog eat, but keep an eye on those bunkers down the right—they’re perfectly placed to ruin your day if you get a bit greedy. Stroke index 14 makes it sound cruisy, but you’ll need to think your way through it, especially if you want a shot at the green in two. It’s one of those holes where playing smart pays off big, and with the natural surrounds putting on a show, it’s a ripper stretch of the course to settle into your round.
Hole 4 – Par 4

Index: 1
Lengths: White: 395y, Yellow: 0y, Blue: 362y, Red: 376y
Hole 4’s the beast of the bunch—par 4, stroke index 1, and it absolutely earns that top billing. From the Whites it plays 395m (432y), Blues at 362m (396y), and the Reds sneak in at 376m (411y), so no matter where you’re teeing off, you’re in for a proper test. The fairway’s tight, and there’s a nasty set of bunkers lurking down the right like they’re just waiting to ruin your round before it’s even warmed up. You’ve got to be sharp off the tee and even sharper on your approach—there’s no cruising through this one. It’s the kind of hole that makes you earn every shot, but if you can thread your way through it clean, you’ll feel like a bit of a legend walking off with par.
Portsea Hole 5 – Par 4

Index: 10
Lengths: White: 314y, Yellow: 0y, Blue: 401y, Red: 288y
Hole 5’s a crafty little par 4 that’ll mess with your head more than your swing. It plays 401m (439y) off the Blues, but drops right down to 288m (315y) from the Reds, so you’ve got options depending on how brave (or reckless) you’re feeling. With a stroke index of 10, it’s meant to be middle of the pack difficulty-wise, but don’t let that fool ya—there’s no water or thick trees to stress about, but the fairway’s got sneaky slopes and the green’s guarded by bunkers that are a real pain if you miss your spot. No hero shots needed here—it’s all about picking the right club, hitting your line, and keeping the ego in check. A classic “think-first, swing-second” kind of hole.
Hole 6 – Par 4

Index: 8
Lengths: White: 330y, Yellow: 0y, Blue: 446y, Red: 308y
Hole 6 is a ripping par 4 that’ll get the brain ticking just as much as the swing. It stretches out to 446m (488y) from the Blues and comes with a big ol’ dogleg smack in the middle—so yeah, if you’re feeling bold, you might have a crack at cutting the corner. But don’t get cocky—there are two fairway bunkers lurking on the right ready to ruin your shortcut dreams. It looks pretty open from the tee, but with a stroke index of 8, it’s no pushover. The smart play? Stick to the left side of the fairway, take the longer line, and give yourself a clean look at the green—just know it’s well guarded and not giving away easy pars. It’s one of those holes where every decision counts, and if you pull it off, you’ll be strutting to the next tee feeling pretty chuffed.
Hole 7 – Par 3

Index: 15
Lengths: White: 169y, Yellow: 0y, Blue: 151y, Red: 150y
Hole 7’s a tidy little par 3 that serves up a breather—well, sorta. It plays 169m (185y) off the Whites, and just over 150m (164y) from both the Blues and Reds, so you’re not reaching for the driver here. No water, no trees trying to snatch your ball mid-flight—just you, the breeze, and a green that’s got a few sneaky slopes to keep you honest. With a stroke index of 15, it’s meant to be one of the softer holes on the card, perfect for a bit of confidence-building if the last few holes have roughed you up. Nail your distance, stick the green, and you’re walking off with a smile and maybe even a cheeky birdie.
Hole 8 – Par 5

Index: 12
Lengths: White: 484y, Yellow: 0y, Blue: 437y, Red: 465y
Hole 8’s a cracking par 5 with a bit of everything—distance, doglegs, and drama. It stretches out to 484m (529y) off the Whites, 437m (478y) from the Blues, and 465m (509y) from the Reds, so there’s a bit of variety depending on where you’re teeing it up. The fairway bends through a centre dogleg that’ll have you thinking hard about your second shot, especially if you’re eyeing off the green in two. But don’t get too eager—the green’s guarded by four bunkers, two either side, just waiting to punish a stray approach. With a stroke index of 12 it’s meant to be fair game, but the layout rewards brains over brawn. Play it smart and it’s a real scoring opportunity; play it loose and you’ll be cursing those bunkers all the way to the next tee.
Hole 9 – Par 4

Index: 5
Lengths: White: 338y, Yellow: 0y, Blue: 407y, Red: 303y
Portsea Golf Club’s Hole 9’s a tough nut to crack and a proper way to close out the front nine. It’s a par 4 with a bit of grunt—407m (445y) off the Blues, 338m (370y) from the Whites, and 303m (331y) from the Reds—so you’ve got to pick your tee wisely. No water or standout landmarks to distract you, but don’t be fooled—this one’s all about the finer details. The fairway’s lined with tall, old trees that tighten things up quick, and the green’s guarded by bunkers just itching to ruin a good round. With a stroke index of 5, it’s not mucking about—you’ll need to keep it straight and steady from tee to green. Get through here clean and you’ll feel like you’ve earned your spot at the turn.
Hole 10 – Par 4

Index: 13
Lengths: White: 256y, Yellow: 0y, Blue: 327y, Red: 214y
The 10th kicks off the back nine with a fun little par 4 that’s got just enough bite to keep things interesting. It plays 327m (358y) off the Blues and drops down to 214m (234y) from the Reds, so whether you’re bombing driver or just poking one down the fairway, there’s a line that’ll work for you. The fairway’s pretty chill—wide enough to let you breathe—but it’s the green where things heat up. Four deep bunkers—two either side—are waiting to gobble up any lazy approach shots, and they’re not exactly easy to escape from either. Stroke index 13 might fool you into thinking it’s a breather, but miss your spot and you’ll be raking sand while your mates line up birdie putts. Hit it straight, land it soft, and you’re laughing.
Hole 11 – Par 5

Index: 17
Lengths: White: 447y, Yellow: 0y, Blue: 319y, Red: 395y
Hole 11’s a cheeky par 5 that serves up a golden chance to get one back—if you don’t stuff it off the tee. It plays 447m (489y) from the Whites and a much friendlier 319m (349y) off the Blues, so there’s something for everyone. With a stroke index of 17, it’s one of the softer holes on the card, but don’t go sleepwalking through it—there’s a pair of bunkers down the right side of the fairway just waiting to catch anything that leaks out wide. Whether you play it safe and lay up short or go full send and try to carry the trouble, it’s a hole that rewards smart thinking and clean ball striking. A great chance for birdie if you stay out of the sand and keep the ego in check.
Hole 12 – Par 4

Index: 7
Lengths: White: 372y, Yellow: 0y, Blue: 173y, Red: 330y
Hole 12’s a cracking par 4 that’s equal parts pretty and punishing. It stretches 372m (407y) off the Whites, 330m (361y) from the Reds, and then throws in a wildcard Blue tee at just 173m (189y) for those wanting to sharpen up the short game. The hole doglegs right through the guts, so you’ll need to shape your tee shot or lay up smart to give yourself a clean second look. No Yellow tee to fuss over, which keeps things simple, but the bunkers guarding the green are anything but—they’re positioned perfectly to catch anything that’s offline or undercooked. Flanked by trees that add to the scenery (and the stress), it’s a proper test that looks nice but doesn’t hand out easy scores. One of those holes where a par feels like a pat on the back.
Hole 13 – Par 3

Index: 9
Lengths: White: 151y, Yellow: 0y, Blue: 244y, Red: 118y
Portsea Golf Club Hole 13’s a brute of a par 3 if you’re off the tips—244m (267y) is no flick with a mid-iron. Thankfully, the Reds are a gentler 118m (129y), and there’s a few distances in between to suit whatever game you’ve got that day. No Yellow tee here, which keeps things simple, but don’t let that fool you—this one still earns its stroke index 9 badge. There’s no trees to block your view, so it’s all about hitting a pure shot and steering clear of the bunkers lurking around the green. Miss short or leak it wide and you’re in the sand with a fiddly up-and-down ahead. Nail the distance and you’ve got a real sniff at birdie—but it’ll make you earn it.
Hole 14 – Par 4

Index: 3
Lengths: White: 407y, Yellow: 0y, Blue: 445y, Red: 330y
Hole 14’s a proper test—par 4, stroke index 3, and it makes you earn every step down the fairway. Off the Blues it’s a hefty 445m (487y), with the Whites at 407m (445y) and Reds at 330m (361y), so it’s no walk in the park from any tee. There’s no dogleg to worry about, but don’t let that straight layout lull you into a false sense of security—this thing’s a bunker minefield, with two traps on each side of the fairway ready to punish anything even slightly offline. It’s one of those holes where strategy matters just as much as swing, and if you can hit your spots, you’ll walk off feeling like you just won a mini battle. Play it smart, avoid the beach, and you’ll set yourself up for a solid score heading into the home stretch.
Hole 15 – Par 4

Index: 11
Lengths: White: 267y, Yellow: 0y, Blue: 374y, Red: 237y
Portsea Golf Club Hole 15’s a crafty par 4 that’ll have you thinking twice before pulling driver. It ranges from 374m (409y) at the back to 237m (259y) off the front, so depending on your tee, it can feel like a scoring hole—or a setup for trouble. There’s a dogleg smack in the middle, so bombing it blind won’t do you any favours unless you’ve got laser-like accuracy. Down the left, a line of tall trees waits to swat down anything wayward, turning an average tee shot into a full-blown scramble. With a stroke index of 11, it’s not the meanest hole out there, but it’ll still catch you napping if you get sloppy. Hit your landing spot, shape your shot, and you’ve got a real shot at walking away with par—or better.
Hole 16 – Par 3

Index: 16
Lengths: White: 158y, Yellow: 0y, Blue: 158y, Red: 132y
Hole 16’s a tidy par 3 that might look like a breather, but it’ll still sting if you take it lightly. Playing 158m (173y) from both the Whites and Blues, and 132m (144y) from the Reds, it’s all about hitting your number and avoiding the sand that’s camped out around the green. There’s no water, no doglegs, no drama—just you, your club, and a green that’s trickier than it looks. With a stroke index of 16, it’s meant to be one of the easier holes out here, but miss your line and you’ll be reaching for the wedge and hoping your bunker game’s switched on. Get it right, though, and there’s every chance to roll in a cheeky birdie and keep the round ticking along nicely.
Hole 17 – Par 4

Index: 4
Lengths: White: 365y, Yellow: 0y, Blue: 407y, Red: 336y
Portsea Golf Club Hole 17’s a tough par 4 that doesn’t pull any punches, playing 407m (445y) off the Blues, 365m (399y) from the Whites, and 336m (368y) from the Reds. With a stroke index of 4, it’s one of the big dogs on the card, and it earns that spot with a narrow fairway flanked by bunkers and a slight dogleg right that’ll punish anything too casual off the tee. There’s no Yellow tee listed, which just adds to its quirky charm. The green’s well-defended, so your second shot needs to be on the money if you’re chasing a par here. No flash or gimmicks—just a good, honest test that rewards smart play and clean ball-striking. Get through this one unscathed and you’ll be grinning on the way to 18.
Hole 18 – Par 4

Index: 2
Lengths: White: 399y, Yellow: 0y, Blue: 181y, Red: 311y
The 18th wraps things up with a cracking par 4 that’s all about holding your nerve. It plays 399m (437y) from the Whites and 311m (340y) from the Reds, and with a stroke index of 2, it’s not here to give you an easy finish. No trees, no water, but don’t think for a second it’s a pushover—there are two nasty bunkers parked right in front of the green, ready to gobble up any half-hearted approach. The fairway’s open enough, but this one’s all about hitting your spots and avoiding a sandy send-off. Whether you’re trying to save your round or win the match, this final hole’s got enough bite to make it memorable—and if you walk off with a par, you’ve done well, mate.
Course Stats Summary
- Holes: 18
- Total Par: 71
- Longest Hole: 484 yards
- Shortest Hole: 151 yards